Efficient SSH Access Management: How Warpgate tames the server jungle

Patrick Daether

The SSH Access Dilemma
Managing SSH access for a multitude of employees across numerous servers can become a real nightmare. In a growing and evolving company, this means each employee requires individual access rights based on their role and responsibilities. Traditional methods of access management, like manually adding and removing SSH keys on each server, can be inefficient and error-prone. Especially in agency environments where many client servers need care, professional management is a must for responsible agencies.
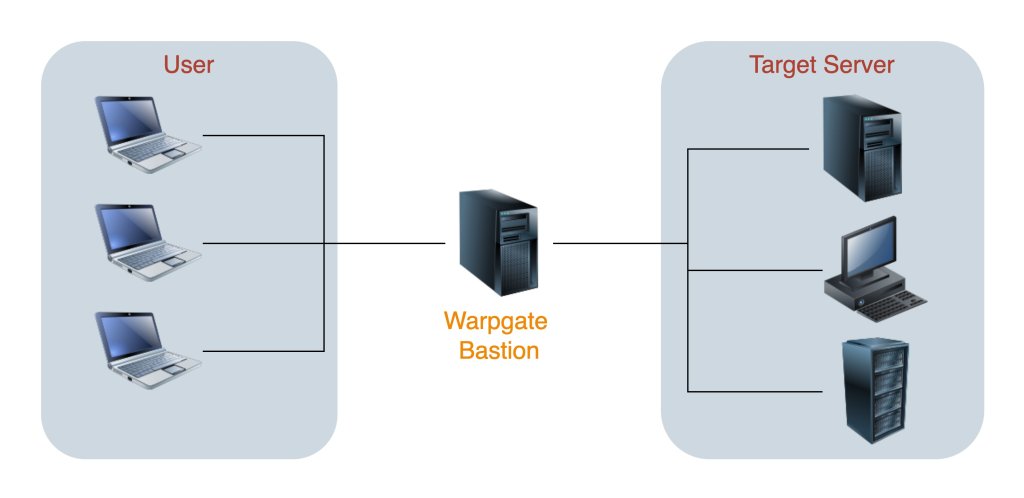
Centralization with SSH Bastion Servers
One solution to this problem lies in centralizing SSH access through what's called SSH Bastion Servers. These servers act as gateways that mediate access to other servers. By utilizing an SSH Bastion Server, companies can centralize access management and enhance security by providing a single point for authentication and authorization.
One of the most well-known alternatives to centralized access management is Teleport, an enterprise platform specializing in securing SSH and Kubernetes access. Teleport offers centralized authentication and authorization for SSH access, simplifying user access management.
Another tool worth considering, especially for those seeking an open-source solution, is bastillion.io. This platform enables centralized management of SSH access via a graphical user interface (GUI), offering features like role-based access control and recording of SSH sessions for compliance requirements.
Warpgate: The Newcomer for SSH Access Management?
Warpgate is a relatively new Bastion Host written in Rust, supporting not only SSH but also HTTPS and MySQL, though not covered in detail in this article. With Warpgate, you can centralize and automate SSH access, thus enabling scalability. The platform provides a simple yet user-friendly interface for managing users, roles, and their access rights, along with features like audit logs and user activity monitoring for enhanced security and compliance. SSH sessions can even be recorded entirely upon request and replayed later.
By implementing Warpgate, companies can save time and resources by simplifying SSH access management while enhancing security. The platform offers a flexible solution for small to medium-sized enterprises and is a valuable addition to any IT infrastructure.
Installation
Installing on a Linux server is quick and straightforward.
Begin by downloading the appropriate binary from the releases and installing it:
# As of writing this, the current warpgate version is 0.9.1

# Download the binary. Here for arm, just look for for architecture
wget https://github.com/warp-tech/warpgate/releases/download/v0.9.1/warpgate-v0.9.1-arm64-linux

sudo mv warpgate-v0.9.1-arm64-linux /usr/bin/warpgate
sudo chmod +x /usr/bin/warpgate
After installation, you can check if everything is working fine by invoking warpgate.
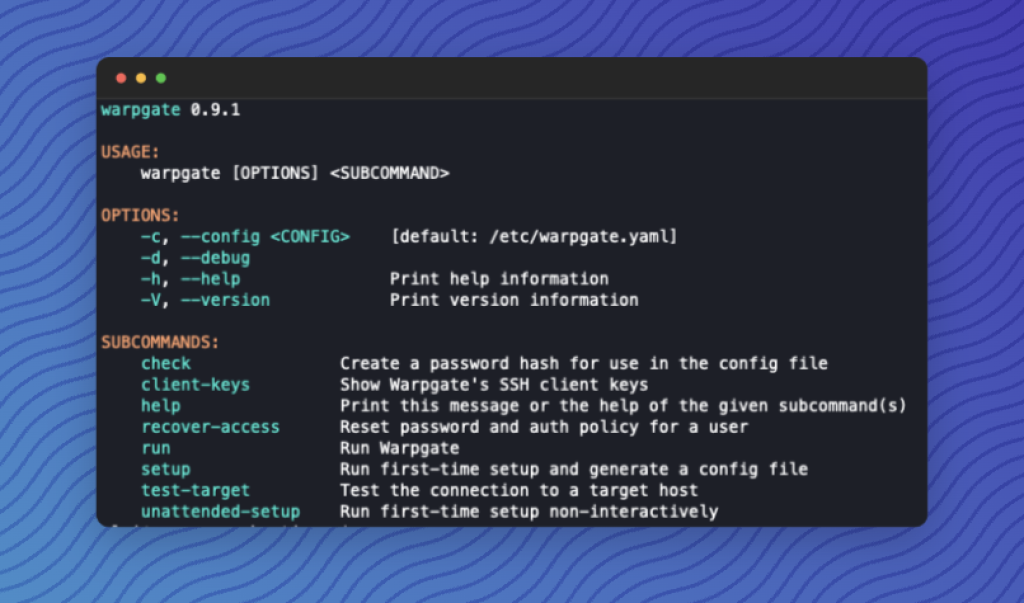
Setup
Then, configure warpgate using warpgate setup. If you prefer MySQL or PostgreSQL instead of SQLite, you can specify the database connection:
sudo warpgate setup --database-url mysql://user:password@server:port/databaseThe configuration will be stored in /etc/warpgate.yaml. You can now start the service for testing with warpgate run. Make sure to open the required ports in the firewall:
sudo ufw allow OpenSSH
# Onyl if you want to access the web ui direcrtly:
sudo ufw allow 8888/tcp
# if you use a nginx proxy (see below):
sudo ufw allow 443/tcp
# For incoming ssh connections:
sudo ufw allow 2222/tcp
The web interface is accessible at https://<host>:8888/@warpgate/admin with the password set during setup.
Setting Up as a Service
You can setup warpgate as a service by creating /etc/systemd/system/warpgate.service with the following content:
Unit]
Description=Warpgate
After=network.target
StartLimitIntervalSec=0

[Service]
Type=notify
Restart=always
RestartSec=5
ExecStart=/usr/bin/warpgate --config /etc/warpgate.yaml run

[Install]
WantedBy=multi-user.target
After that reload the configuration and enable warpgate as a service.
systemctl daemon-reload
systemctl enable --now warpgate
Operate behind an Nginx Proxy
I'd recommend placing an nginx proxy or something similar in front of the web interface.
location /  {
    proxy_pass https://127.0.0.1:8888;
    proxy_set_header Host $http_host;
    proxy_set_header X-Forwarded-Proto $scheme;
    proxy_http_version 1.1;
}
Users and Roles
In Warpgate, you can create users and roles. Need to grant someone access to a server? Just activate the role for that server. While you can't add a user directly to a server, sticking with roles is a solid practice, especially as your setup starts expanding rapidly.
Adding SSH Targets
To add a new SSH Target to Warpgate, you first need to add Warpgate Public SSH Key to the authorized_keys file. This ensures that Warpgate can login via SSH.
You can find the SSH Keys via the Warpgate UI when you click on the SSH-Menu.
Then in the Warpgate dashboard click on Config and Add a target. He you can give the server a name and enter all needed information like the IP, Username and the SSH Port.
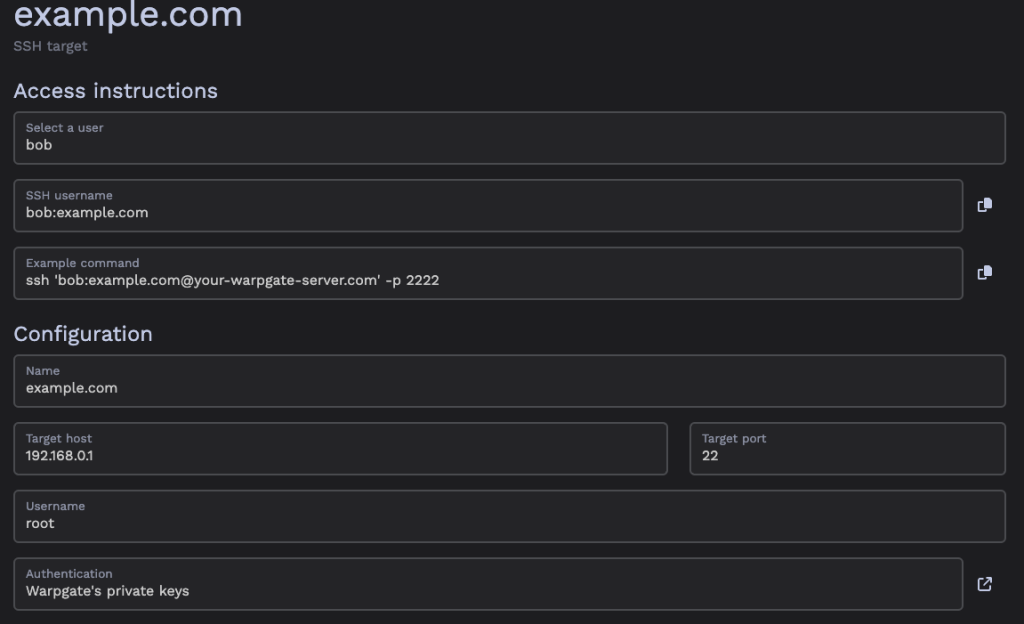
Usage
For end users, there isn't much change in usage. Instead of specifying the target server directly as before, you now use the Warpgate server with corresponding usernames:
# Instead of
ssh root@example.com
# you now can use
ssh 'bob:example.com@your-warpgate-server.com' -p 2222
Conclusion
Effective management of SSH access is crucial for companies to ensure security and boost productivity. By centralizing and automating access management, companies can reduce complexity while improving security. Warpgate is still relatively young and may not match enterprise solutions in scope. Nevertheless, Warpgate offers a good solution for SSH Access Management and is an investment particularly worthwhile for companies managing accesses to many (client) servers.